Areas of application
The measuring device can be used to calculate the emissivity of almost any surface in a non-destructive manner. As an extension to the spectral measurement principle according to DIN EN 12898:2001, non-planar surfaces and large components can also be assessed. Optionally, measurements can also be carried out on installed structures if required, whereby the surfaces should preferably be in a vertical position (±30°). A further possible use is quality control during production. For precise results, surfaces must be opaque to long-wave radiation. Thanks to the versatility of the procedure, measurements can usually be carried out at short notice.
Measuring technique
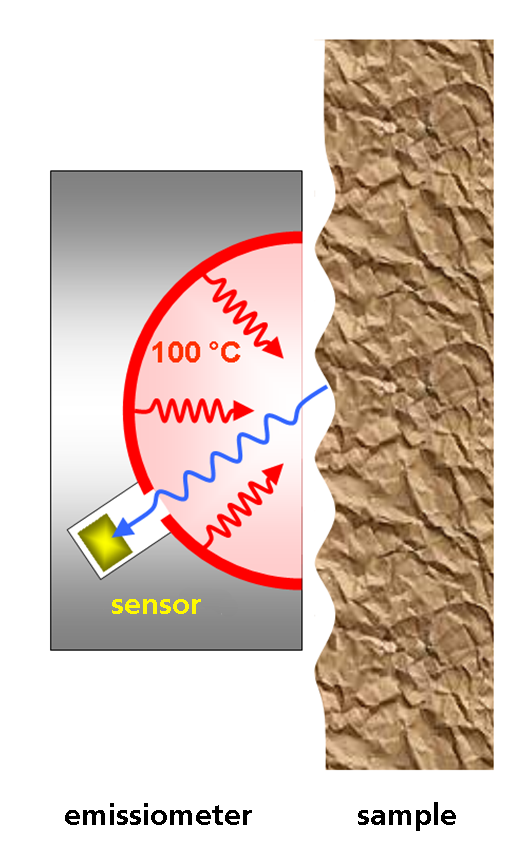
The measuring device is the size of a shoe box and is therefore portable. The measuring principle is based on the exchange of radiation between two opposing surfaces at different temperatures. For this purpose, the device contains a hemispherical membrane that is kept at a constant temperature of 100 °C, while the sample itself is usually at room temperature. The geometry of the radiator also allows structured surfaces with elevations of a few millimeters to be reliably measured. The reflected IR radiation is detected by a sensor and compared with the reference values of two calibration standards by means of evaluation electronics. The procedure meets the requirements of the standards DIN EN 15976 and DIN EN 16012, Annex D.
Spectrally-resolved measurements with an FT-IR spectrometer are also possible on request.
| Measurement | Thermal emission coefficient and reflection coefficient |
| Standards | DIN EN ISO 22097, DIN EN 16012 (Annex D, withdrawn), alternative method for DIN EN 12898 and DIN EN 673 |
| Measurement object | Glass including functional layers, insulation materials, roofing underlays or coverings, building panels, façades, floor coverings, concrete, asphalt, IR-reflecting films and almost all surfaces and structures with roughness up to 10 mm, opaque to IR radiation, varnishes and paints on substrate |
Technical data
| Spectral range | 2.5 to 40 μm |
| Measurement range | 0.02 to 0.99 % |
| Test specimen dimensions | Optional, minimum size 100 × 100 mm |
Special feature
| Scope of application | Nondestructive method, investigation of already existing building products, quality control during production |
More information
- Surfaces preferably mounted in vertical position (±30°)
- In-situ measurements under appropriate conditions possible
